This guide explains how to create reliable, best practice Hyper-V backup of your Hyper-V Server using BackupAssist System Protection.
File Protection and File Archiving can also be used to back up Hyper-V environments, but System Protection is our recommended backup type for Hyper-V because it supports:
- Customized Hyper-V destination, CSV and Exchange Server detection steps
- Block level backups of a Hyper-V Server
- Incremental image backups, including fast incremental.
- Superior handing of large files.
- Bare-metal recovery
For additional information on Hyper-V backup solutions, refer to our Hyper-V guides.
Hyper-V backup requirements and features
Hyper-V requirements
See out supported platforms page to view what version of Windows Server are supported for Hyper-V
Pre-requisites for BackupAssist Hyper-V backup:
- If Windows Server Backup is not installed, BackupAssist will provide a prompt to install it when the first backup job is created.
- In a CSV environment, BackupAssist must be installed and licensed on each host.
- For Windows Server 2008 / 2008 R2, partition size of the disks being backed up should be less than 2TB
The following features support guests backed up from CSV environments:
- The Exchange granular restores
- The Hyper-V granular restores
Windows 2012 / 2012 R2 Hyper-V support
Windows Server 2012 introduced the CSVFS format, which allows a cluster to differentiate CSV storage from NTFS storage. BackupAssist’s support for these and other feature is listed below:
- BackupAssist can back up Hyper-V guests located on CSV storage using the CSVFS file system.
- BackupAssist supports SMB 3.0 servers as a CSVFS backup destination.
- BackupAssist does not support backups of CSVFS and NTFS locations in the same snapshot. E.g. It’s not possible to back up a guest that uses CSV as well as a guest that uses an NTFS volume.
- BackupAssist supports Hyper-V Replica and can back up and restore a primary Hyper-V guest.
Best practice Hyper-V backup
The backup media will be made bootable the first time the job runs unless you deselect the Make media bootable with RecoverAssist tick box on the Set up destination step.
Backing Hyper-V virtual machines, can become complicated once you factor in host data, volumes, domains, disks, VSS writers, services and the resulting issues that can arise. To keep the backups of your virtual machines as simple and robust as the environments themselves, we’ve put together a list of 10 tips for best practice Hyper-V backups.
Do not install other roles or applications on your Hyper-V host.
Your physical Hyper-V host server should only have one function, to be the Hyper-V host server. It should not double as a file server, a DNS server or, even worse, an application server. Any non-Hyper-V software and data should be on another physical server or one of the Hyper-V guests.
If you don’t follow this advice, you can complicate host level backups and affect the stability of the host server itself. Any problem with another role or application on the Hyper-V host can impact the guests. Even something as simple as a patch to an application could require a physical server reboot, and cause an outage for all of your Hyper-V guests (VMs) and the services they provide.
Only assign a single role or application to each guest
Each Hyper-V guest (VM) should only have a single role or application. It’s easy enough to make another guest, and dedicated environments are what make virtual machines so great.
For backups, having only one role or application per guest makes it easier to:
- Recover guests and services in a managed way.
- Allocate backup agents and licenses
- Perform granular restores of data inside of Hyper-V guests.
Focus on a guest only Hyper-V backup
The Hyper-V host provides the platform, architecture and processes required to support and maintain your Hyper-V guests (VMs). Although it’s good to have a bare-metal backup of the entire physical server, backups of just the Hyper-V guests can also be very useful as they contain all the data you need and use less space. For a recovery, you can just reinstall the Hyper-V Server and use the backup to add the guests back. A mix of weekly full-metal archive backups and daily “guest only” backups can provide a good balance.
Enable Hyper-V integration services
Backup software can use a VSS snapshot to maintain a copy of data that has changed during the backup, so that all of the data in the backup reflects the data as it was at a single point in time – this is called crash-consistent. Application-consistent means a VSS-Aware application checks its own files in the VSS snapshot to make sure they are correct. For example, information in memory and uncompleted database transactions are included in the snapshot, making it more accurate and consistent. This is critical, especially for applications like Exchange and SQL.
Without Hyper-V Integration Services installed, a Hyper-V guest (VM) will not be aware of the backup job so you will only get a crash-consistent backup. When you install the Hyper-V Integration Services on the host, and enable it on the guest, the host and guest VSS writers can work together to create online, application-consistent backups of applications like Exchange and SQL, inside the Hyper-V guest.
Run the Hyper-V backup on the Hyper-V host server, not the guest
The easiest way to protect Hyper-V guests is to install your backup software on the Hyper-V host (physical server) and back up the guests from there. This way you can back up multiple guests using the same backup job, and have those guests in a single backup. This will also save money, because you only need one backup license. Some backup solutions may require a backup agent on each guest but BackupAssist only requires a single host license.
As long as you have Hyper-V integration services installed, the Hyper-V VSS writer on the host, where the backup is running, can communicate with an application (Exchange, SQL) VSS writer on the guest, so that you have application-consistent backups of all guests – in a single backup.
To learn more about the VSS process, see our virtual shadow copy article.
Do not backup a CSV device directly
If your guests use a cluster shared volume (CSV), do not back up the CSV device directly because the Hyper-V Server’s VSS writer will not be involved. Back up the Hyper-V Server so that the Hyper-V VSS writer is used to make application-consistent backups of data on the cluster shared volume.
Don’t put the Hyper-V host on the same domain as the guests
This safeguard applies when one of your Hyper-V guests (VMs) has the role of domain controller. If that domain controller guest goes down and the host is on the same domain, you may not be able to log into your Hyper-V Server.
Hyper-V Backup of the whole volume
When performing a Hyper-V image backup (i.e. BackupAssist System Protection backup), it’s best to back up the whole volume. This can improve the performance of incremental image backups, and it makes the backups faster.
If you follow this best practice, and backup the whole volume, you should have your non-production guests (VMs) on a different volume, so that you can exclude them from the backup. If you mix guest categories or guest files across volumes, both backups and restores become more complicated and less efficient.
Keep system and guest data on separate volumes.
The volume you install Microsoft Hyper-V Server onto, and the volume used by the physical server’s operating system, should not be used to store Hyper-V guest data (VHDs). For example, if your physical server uses C: drive, your Hyper-V guests should not. They should have their own volumes, and those volumes should not contain system files, such as the physical server’s swap file. This is important for performance and to remove conflicts. It’s also important for backups because you want to be able to make “guest only” backups using complete volumes.
Use fixed virtual disks
The types of disks you use can have an impact on your Hyper-V host server’s performance and data integrity, both of which are important for backups. For this reason, your Hyper-V host server should use fixed virtual disks. Pass-through disks add complexity and don’t allow VM snapshots or Hyper-V replica, and dynamic and differencing disks add a performance and space overhead. Fixed disks enable better performance and data integrity. This means better backups.
Hyper-V backup in a CSV environment
Cluster Share Volume (CSV) is Microsoft’s implementation of server clustering, and designed for use with Hyper-V. CSV provides a shared disk that can be used by any guest in the cluster. This means a guest can be moved within the disk cluster, and guests can share the same physical disk. This improves flexibility and helps to provide seamless operation in the event of a system or hardware problem.
When stored in a CSV, a guests files present as a shared resource between the hosts. As the CSV’s files are shared, access must be coordinated so that only one host accesses a guest’s files at a time.

This diagram depicts a configuration with a small cluster of two hosts with a single virtual machine, which may fail-over at any time from Host 1 to 2. This virtual machine will only be active on a single host at any time – referred to as the active node. The other node is called the passive node. Other virtual machines added to the cluster may be active on either host at any point in time.
Backuping up a CSV environment:
Because a backup of a CSV must be coordinated, BackupAssist jobs on each host must have their start times staggered. The scheduled start time of the jobs on each host must be set at least 5 minutes apart. This allows BackupAssist time to initialize and coordinate its access to the CSV. BackupAssist will delay the second job so that it will not commence until the first job has completed.
CSV backup considerations:
- BackupAssist v9 and later supports Hyper-V CSV on both Windows Server 2008R2 and 2012 R1/R2 machines.
- During the backup process, the guests are copied to an intermediate staging area, from where they are backed up into a single image. The staging disk acts as a cache for the backup job.
- The staging disk must be a local disk and it is overwritten each time a backup is run.
- The staging disk must be able to hold every guest being backed up from all CSVs used to store the guests’ files (a copy of every file). The staging disk must be used for this purpose only.
- When a fail-over or migration occurs, one or more of the virtual machines will no longer be active on the original host. Therefore, BackupAssist must be installed and licensed on each host.
Restoring to a CSV environment
When a guest is successfully restored to a Hyper-V cluster (CSV), it will become available on the Hyper-V machine that it was restored to.
- If the restore replaces the existing guest, the CSV settings will be retained and the guest will be added back to the cluster.
- If the restore does not replace the existing guest, the CSV setting will need to be manually configured to add the guest to the cluster.
Hyper-V tab
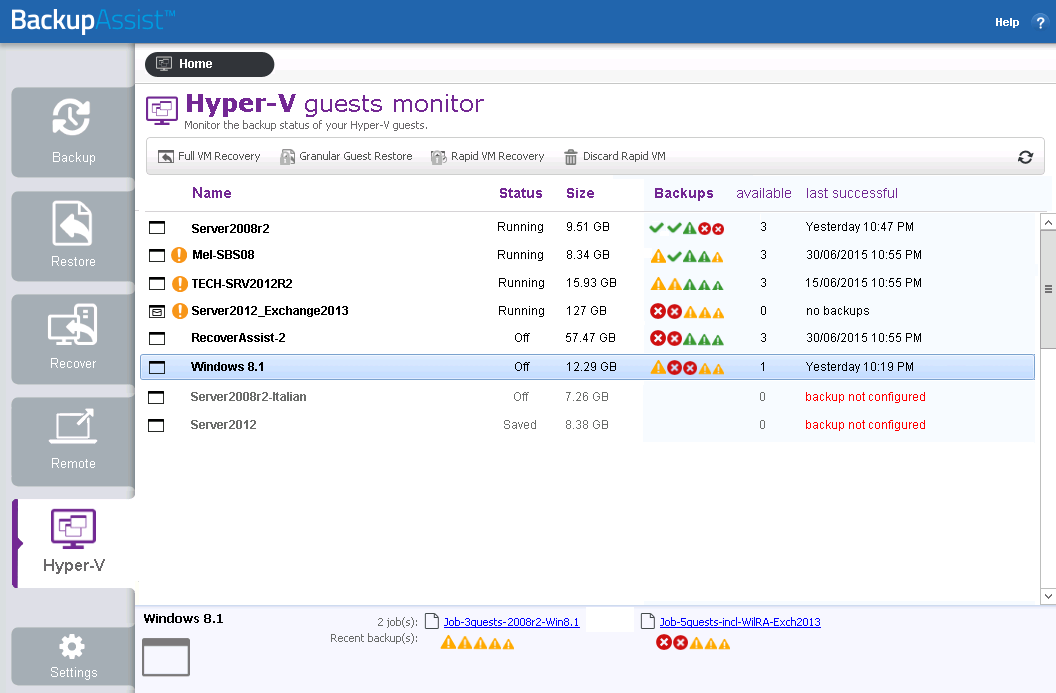
When you install BackupAssist on a server with the Hyper-V role installed, a Hyper-V tab will appear. The tab lists all guests on the server, including those without BackupAssist. At a glance, you can see what guests are active, what guests are being backed up and when the last successful backup ran. You can also begin a granular restore or a guest recovery.
Hyper-V tab columns
The Hyper-V tab lists all of the guests on the Hyper-V host, and uses columns to provide information about the guests. You can sort the guests by selecting a columns’ heading.
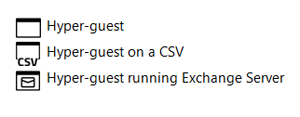
The Name column displays the name of the guest. To the left of the name are two icon columns. One column shows if the guest has an error, alert or warning, the other column, the guest’s configuration. The configuration icon will indicate if the guest uses CSV and if it is running an Exchange Server.

The Status column shows if a guest is running, backing up, saved, paused or off. Guests can be started and stopped using the Microsoft Hyper-V Manager.

The Size column shows the total size of the guest’s virtual disk and configuration files, on the host.
The Backups column shows the results of the last 5 backups. The icons indicate if the backup was successful, had a warning or failed. Mouse over an icon to display any warnings, errors or messages.
The available column shows how many backups are available for restoring to the guest, and the last successful column shows when the last successful backup job ran.
Guest details view
When you select a guest, a details panel will display guest information at the bottom of the tab. The information provided includes links to the backup jobs configured for that guest, and the results of recent backups. The results are displayed as icons below the relevant backup job.

Selecting the job’s result icon will open the backup report for that backup.
Hyper-V Tab menu
The Hyper-V Tab’s menu can be used to access BackupAssist’s guest restore and guest recovery tools.
Granular Guest Restore
This button starts the guided restore process for the selected guest. This process will use the Integrated Restore Console to restore files and folders from inside the guest. Hyper-V Granular Restore can also be accessed from the BackupAssist Restore tab.
Granular Guest Restoreis a licensed feature that requires the Hyper-V Advanced add-on.
Full VM Recovery
This button will take you directly into the Full VM Recovery process with the highlighted guest already selected. The Full VM Recovery console will be used to recover the guest to the current host. Full VM Recovery can also be accessed from the BackupAssist Recovery tab.
You can perform a Full VM Recovery of both a normal VM and a Rapidly Recovered VM. To learn more about these options, see the BackupAssist Rapid-VM Recovery guide
Full VM Recovery is included in the base BackupAssist license.
Rapid VM Recovery
This button starts a Rapid VM Recovery, which will use the current Hyper-V host to run a guest from its backup. This means if the guest that was backed up becomes unavailable, the backup can be used to resume that guest’s functions within seconds, while a recovery of the guest is planned and scheduled.
When you select the Rapid VM Recovery button, you will be asked to confirm if you want to proceed with a Rapid VM Recovery for the selected guest.
Rapid VM Recovery is a licensed feature that requires the Hyper-V Advanced add-on.
Discard Rapid VM
This will stop a Rapidly Recovered VM, discard any changes made to the guest’s data since it was rapidly recovered, and remove the guest instance from the Hyper-V Manager.
Hyper-V Backup
You can learn how to create a Hyper-V backup using System Protection on our step-by-step Hyper-V backups page.
When you use BackupAssist System Protection to create a Hyper-V backup job, you will be presented with some Hyper-V specific setup screens, as described in this section.
Hyper-V Data Selections screen makes it easier to select Hyper-V guests and guest configuration files for Application consistent guest only backups, as well as full host backups.
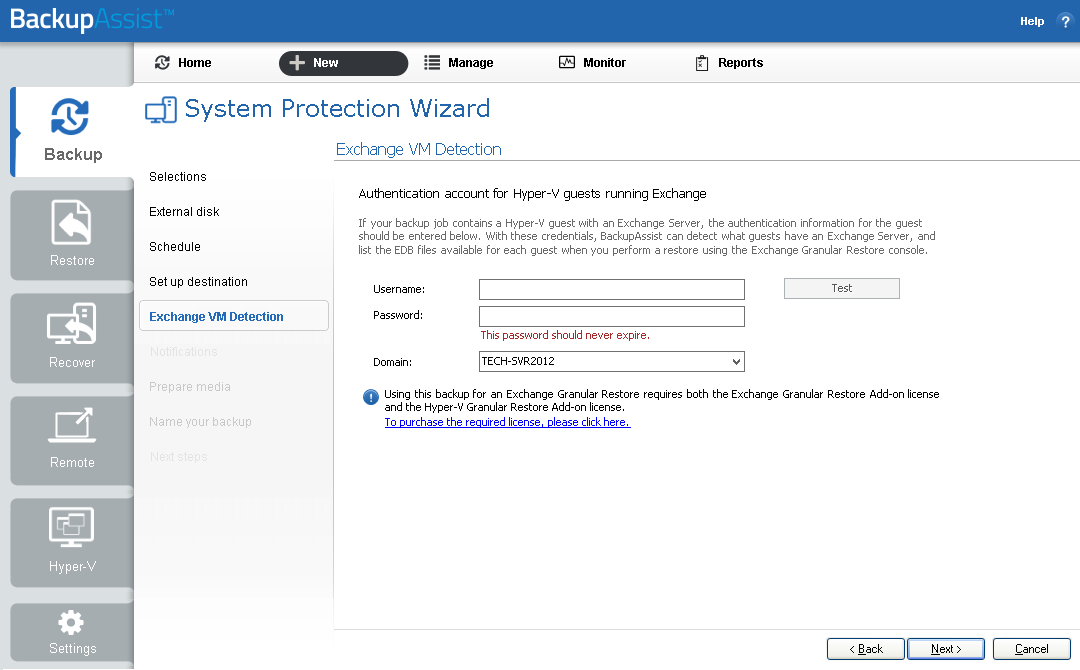
There will also be an Exchange VM Detection steps that is used to provide authentication information for that guest. With this information, BackupAssist can see what guest contains the Exchange Server, even if it is on a different domain to the host. BackupAssist can then create a backup catalogue of the Exchange Server’s EDB files that the Exchange Granular Restore Add-on can use to perform a granular restore.
When you create a Hyper-V backup, all active Hyper-V guests and their host will be detected and displayed for selection.

If more than one guest has an Exchange Server, then each guest with an Exchange Server should be on the same domain, and accessible using the same account. This account’s username, password and domain is entered in the Exchange VM detection screen.
A granular restore of Exchange data from a Hyper-V guest, requires both Hyper-V Granular Restore Add-on (which will run automatically as part of the restore) and the Exchange Granular Restore Add-on licenses.
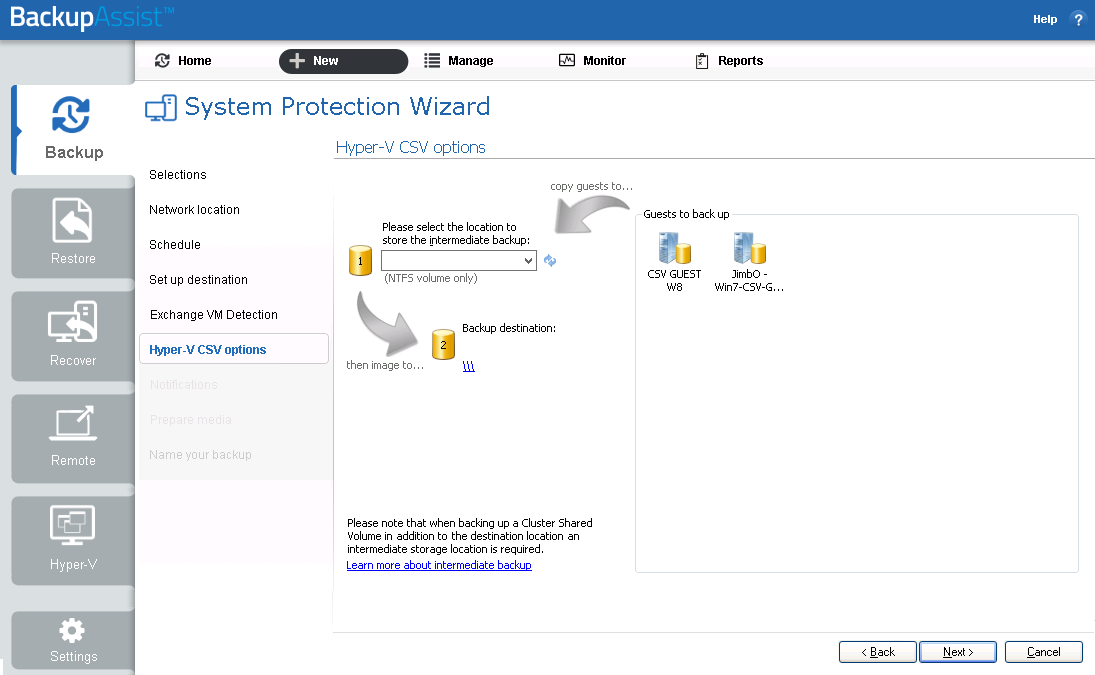
If you are using a clustered shared volume (CSV), there will be a Hyper-V CSV step that is used to configure an intermediate backup location, called a staging disk. System Protection uses the staging disk to put the Hyper-V host and its guests into a single image backup (VHD file), even if they are on different volumes.

Hyper-V CSV staging disk considerations:
- The intermediate backup’s location must be a local disk.
- The intermediate backup’s disk is overwritten each time a backup is run.
- The image backup is taken from the whole staging disk.
- The staging drives available and the Backup destination shown are based on the selections made during the Set up destination step.
If you have selected BitLocker encryption, use the prepare media button to indicate what drives are to be encrypted. The encryption process will be initiated by the final backup job creation step.
Hyper-V restore
BackupAssist’s Restore tab displays two restore options for Hyper-V: Hyper-V Host Files and Hyper-V Granular Restore.
The Hyper-V Host Files restore option allows you to restore files and folders from the Hyper-V host to their original location or a new location. Hyper-V Host Files comes with the BackupAssist base license.
Hyper-V Granular Restore allows you to restore individual files from a guest using a Hyper-V backup of one or more guests. Hyper-V Granular Restore requires the Hyper-V Advanced add-on license.
You can also restore mail items from an Exchange Server installed on a Hyper-V guest by using both the Exchange Granular Add-on and the Hyper-V Advanced Add-on.
Hyper-V recovery
BackupAssist can be used to perform a full VM recovery and a Rapid VM recovery
Full VM Recovery
A Full VM Recovery uses a backup of a guest to recover that guest to a Hyper-V host. This will return the guest and its operating system, applications, data and services, to a previous working state. You can recover the guest to its original location, overwriting the existing guest, or to a different location on the host. You can also recover the guest’s VHD (virtual hard drive) to a different Hyper-V host and use that VHD to create a new guest.
Rapid VM Recovery
A Rapid VM Recovery runs a guest on its backup destination, and the Hyper-V host treats that guest as a regular guest. A Rapid VM Recovery can be performed in just a few minutes so that the critical functions performed by the guest can be resumed with minimal interruption. This temporary solution provides business continuity until a suitable time can be found to perform a Full VM Recovery, which could take many hours.
Rapid VM Recovery is part of the Hyper-V Advanced add-on
The Hyper-V Config Reporter
Best practice backup standards require you to document the configurations of every important server so you can recreate or reconfigure it in the event of a major disaster. With Hyper-V, if you need to migrate a guest machine from one host to another, or restore a guest to a new host, you need the configuration settings of the relevant guest(s) so you can manually create new guest machines that match the original configuration.
To fully document the setup of a Hyper-V Server, you need to include the setup of each guest machine and the configuration of the host. The BackupAssist Hyper-V Config Reporter (included with the Hyper-V Granular Restore Add-on ) simplifies and automates this task by creating an HTML report of the configuration settings for each Hyper-V guest VM, and the Hyper-V host settings. The report contains everything needed to recreate the host, migrate a guest from one host to another, or restore a guest to a new host.
Note: System Protection backup reports contain a Recovery options section, which explains the BIOS, EFI and Hyper-V guest recovery options available for each System Protection backup.
To generate a report using the Hyper-V Config Reporter:
1. Run the Hyper-V Config Reporter from the Windows Start Menu on the Hyper-V host machine.
The Hyper-V Config Reporter will display a list of guests configured on the Hyper-V host.

2. To generate a report of your guest VM settings, select the individual guest from the list that you want, and click Generate Report.
Check Include Host Security Report if you want the report to include security and access settings that have been configured on the actual Hyper-V host.
3. A HTML report will then be created and displayed in a new window.
You can use the buttons at the top of the Hyper-V Config Reporter window to either print a copy of the report, save the report to a HTML file that can be opened with a web browser, or close the report window.

At the top of the report, as shown below, is a list of all the guest VMs selected during the previous step. If you click the Virtual Machine Name link of any guest in the list you will be directed to a list of settings for the latest running configuration for that guest VM.

Under the list are details of each VM and its associated snapshots. You can click the link for any available snapshot to view the specific settings associated with that snapshot. Each VM included in the report will contain a full description of the VM settings for the latest running configuration at the top, and then a list of any further snapshots available underneath that, in date order.

The Host Security Report will be located at the very bottom of the overall report.